• Skip to primary navigation
  • Skip to main content
Contact
Beech Village Hall logo

clientsite.uk

  • What’s on
    • What’s on
    • Browse events
    • Booking information
    • Beyond Beech
  • Health & Wellbeing
    • Health & Wellbeing
    • Meet our Practitioners
    • Join our Practitioner community
  • Hire a space
    • Hire a space
      • Hire a space
      • Celebrations and Life Events
      • Children’s parties
      • Commemorations
      • Groups and organisations
      • Wedding receptions
    • Check availability
      • Check availability
      • Main Hall availability
      • The Wellhouse availability
    • Find caterers and suppliers
    • Packages and pricing
  • Community
    • Community
    • Community Groups and Clubs
    • Members’ corner
    • Browse Volunteer roles
    • Community information

Using the hall

How to use the Audio Visual system in the main hall?

8 December, 2024

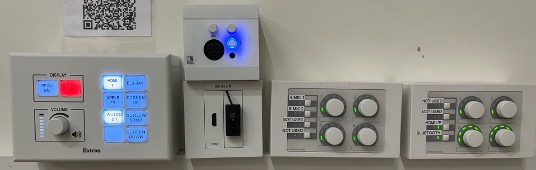
The main hall has a range of audio visual equipment to support:

  • Music and dance played through a 2 channel disco sound system with disco lights and a choice of inputs:
    • BlueTooth
    • 3.5mm jack plug
    • HDMI
  • Presentation from a computer using an HDMI input
  • Public address using a microphone
  • Film and theatre presentations to our 4.5M wide screen using a 4K UHD 7,500 Lumens laser projector from:
    • UHD Blu-ray disc
    • Digital streaming services for example BBC iPlayer
  • Live events broadcast using digital streaming services

How to use the Audi Visual (AV) system

Please review our BVH Audio Visual system user guide

Please note:

  1. Whilst the hall has a Premises License that covers these activities the hirer is responsible for ensuring they have the appropriate copyright licenses for the materials that they use.
  2. As we are located in a quiet and peaceful village with close neighbours we specify a maximum noise level in our terms and conditions. For more information please see this FAQ article:
    • clientsite.uk/faq/is-there-a-limit-on-the-volume-of-music/
  3. Usage of some our Blu-ray player or microphones requires access to our media cupboard which must be arranged in advance.

How to hire and set up the Marquee?

4 January, 2024

We have a large Marquee measuring 6m x 12m and this can be placed on our village green outside the hall. The Marquee has side panels but does not have a floor.

The Marquee is available for hire where the hirer commits to set up and take down the Marquee.

  • Setting up and taking down the Marquee requires a team of 10 people for 2-3 hours
  • The video below steps through the process for a similar marquee.

Marquee set up Safety Basics

A quick guide for volunteers helping put up or take down our 6m x 12m marquee and 3m x 6m stage.

1. Lifting and Carrying

  • Never lift alone. Poles, stage decks, and folded marquee sections are heavy and awkward — always use a two- or four-person lift for anything bulky.
  • Plan before you lift. Agree who’s carrying, where it’s going, and clear the path first.
  • Use good technique: feet shoulder-width apart, bend your knees (not your back), keep the load close to your body, and avoid twisting — turn your feet instead.
  • Lift in stages for heavy or high items (e.g. stage sections onto trestles) — rest the load partway if needed rather than forcing it in one go.
  • Know your limits. If it feels too heavy or unbalanced, stop and get more hands or a trolley/sack truck.
  • Free official training: HSE – Good Manual Handling Technique

2. Gloves

  • Wear gloves whenever handling poles, stakes, guy ropes, or stage frames — they protect against splinters, pinch points, and rope burn.
  • Use grip-palm work gloves for general rigging; consider cut-resistant gloves if handling metal edges or cutting cord.
  • Remove gloves (or use snug-fitting ones) around power tools such as drills, to avoid snagging.

3. Trip Hazards

  • Stakes and pegs: flag with hi-vis tape or cones until guy ropes are tensioned and the layout is finished.
  • Guy ropes and cables: keep walkways clear; route power cables away from foot traffic or cover them.
  • Ground clutter: clear packaging, tools, and offcuts as you go — don’t wait until the end.
  • Uneven ground: watch for holes, tent pegs, and cabling especially in low light — consider temporary lighting for early morning or evening builds.

4. General Reminders

  • Wear sturdy, closed-toe boots — no sandals or trainers.
  • Take regular breaks, especially in hot weather or during long build days.
  • Report any near-misses or injuries.

How to test and reset the fire alarm points?

31 December, 2023

Test:

  1. Check that the light on the front flashes green every 40 seconds.
    1. This indicates it has power.
  2. Press the black spot and the white element will drop down exposing the yellow edge to show it is activated.
    1. The light will turn red and stay on continuously for 3 seconds and then continue to flash red (every 20 seconds) for 5 minutes indicating transmission of the alarm signal.
    2. After 5 minutes the alarm signal and the smoke alarms will stop.
      1. This prevents the batteries in the Manual Call Point and the alarm from being depleted).


Check:

  1. Alarm audible in each room.
  2. Kitchen smoke shutter lowered.


Reset:

  1. Use the plastic key by pushing the forked end (arrow side up) into the slots (see Figure 1)
  2. Pull the bottom housing down (see Figure 2)
  3. Remove the plastic key.
  4. Now push the bottom housing firmly against the back and slide upwards.
    1. This resets the switch.
    2. The yellow strip on the white element should now be hidden.
    3. If the Manual Call Point is not reset the light will flash red every 40 seconds to remind the user to reset it.
    4. If the light flashes amber every 9 seconds this indicates that the batteries are depleted

Reset kitchen smoke shutter using key from keysafe.

How to use the Dishwasher in the kitchen?

21 December, 2023

The dishwasher is a ‘commercial’ dishwasher. Unlike a home dishwasher, the system is reliant on pre heating the water to enable a rapid cycle time. This works well if you follow a few simple instructions

  1. Allow 20-40 minutes for the machine to pre-heat
  2. Always rinse food debris off the plates before washing
  3. Always remember to follow the draining down instructions at the end of the event

To operate the dishwasher please use the buttons on the front of the machine:

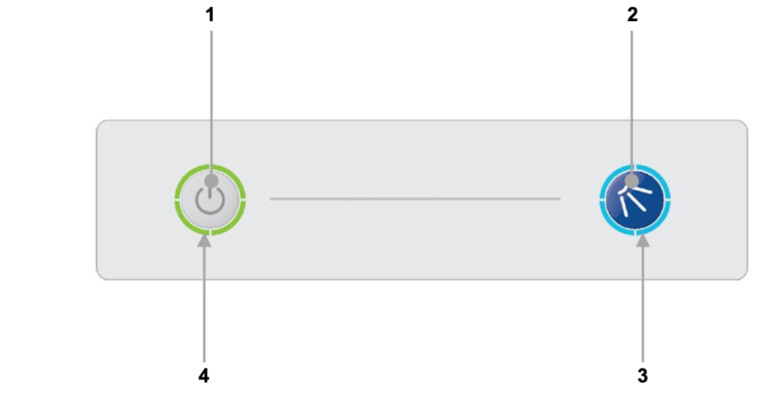
  1. On/Off button
  2. Cycle button
  3. Cycle indicator
  4. Heating indicator

Turning on the machine

To turn on the machine ensure the door is closed and press the On/Off button (1) on the keypad of the machine, the display will illuminate, the machine will start to fill automatically as long as the door is closed.

Once the wash tank is filled and both tanks are up to the required temperatures the heating indicator will illuminate green to indicate the machine is ready to run a cycle.

  1. This will take approximately 20-40 minutes.
  2. During the fill stage the heating indicator (4) will flash amber.

Loading a basket

Before loading a basket rinse off any food waste:

  • Always remove excess food/debris from any dishes/glasses to be washed. DO NOT use the machine as a waste disposal unit.

Long cutlery, such as ladles and long knives etc., must be placed horizontally on the open basket this will avoid possible collision with wash/rinse arms.

Starting a cycle

To start a cycle, follow the instructions below.

  1. Open the door
  2. Load the full basket, ensuring that bottom and top arms rotate freely.
  3. Close the door
  4. Press the cycle button (2).
    1. The cycle will start once the machine has achieved its correct water levels and temperatures.
    2. During the cycle the blue cycle indicator (3) will be illuminated blue.
    3. The cycle will run for approximately 3 minutes.
  5. At the end of the cycle, once the cycle indicator (3) has gone out. Open the door and remove the basket
  6. Reload the machine and repeat as required.

Please note:

  1. Do NOT open the door during a cycle
  2. The machine has a heat interlock to ensure that the rinse is in accordance with environmental health requirements. This will extend the wash cycle if the rinse boiler has not achieved the required temperature.
  3. If the cycle button is pressed before the machine has reached the required levels the cycle indicator (3) will illuminate blue to indicate that a cycle has been selected, the heating indicator (4) will flash amber and the machine will automatically start when the requirements have been met.

Warning

Items in the basket may be wet and will dry in a short time due to evaporation.

Be aware: Items may be hot when removed from machine

End of event, please drain the machine

It is very important the machine is drained down at the end of each working day. To fully drain down the machine follow these instructions:

  1. Close the door to the machine
  2. Press the On/Off button (1) to turn off the machine.
  3. Press the cycle button (2)
  4. The cycle indicator (3) will flash blue.
  5. The machine will drain down the wash tank.
  6. The machine will do a self-rinse.
  7. When the cycle indicator (3) goes out the drain cycle is complete.

How to control the Wellhouse heating?

20 December, 2023

The heating in The Wellhouse is underfloor and the heat source is an external air source heat pump. The design is to keep The Wellhouse warm and cosy at all times!

  1. The Wellhouse was refurbished in 2025 and is extensively insulated and the main source of heat loss is when the extrance door is left open. 
  2. Please ensure that you keep the entrance door closed to maintain the temperature.

The temperature is controlled by thermostats in each room. The temperature is normally set based on a schedule but can be manually overridden by pressing the in room thermostat.


How to report a problem or incident?

20 December, 2023

Here the numbers to call for immediate help. After the incident please ensure the details are reported using this Problem reporting form or email bookings@beechvillage.org.uk

In case of Accident, Injury or Safeguarding concern:

What

What/Where

Call

Emergency


999

Not sure what to do?

NHS 111 can help if you have an urgent medical problem

111

Defibrillator

Outside the front entrance on the right

(dial 999 for assistance)

First Aid kit

In the Village Hall kitchen


Hospital A&E

Basingstoke NHS Foundation Trust, Aldermaston Rd, Basingstoke, RG24 9NA

01256 473202

Doctors Surgery

Chawton Park Surgery, Chawton Park Road, Alton, GU34 1RJ

01420 542542

Out of hours:

0208 390 9991

Safeguarding

Emergency

999

Child or Adult in danger

101

Report a concern about a child

0300 555 1384

Report a concern about an adult

0300 555 1386

  • Page 1
  • Page 2
  • Page 3
  • Interim pages omitted …
  • Page 5
  • Go to Next Page »

  • About
  • FAQ
  • Legal